Search This Blog

Showing posts with label thin set. Show all posts

Saturday, January 2, 2016

Basic Tools You Need to Lay Tile

The basic tools needed to lay tile are available at Home Depot, Lowes and most tile stores.


Tile tools are pretty cut and dry, and the basic set of essentials will cost you about $100. I've taken photos of my tools for this blog  and these are not new tools  They have been well used  on a daily basis. These are the required tools to do a tile job in or around your home.  The wet saw is included but not required. All the cuts can be made with the 4 inch grinder and the tile cutting machine
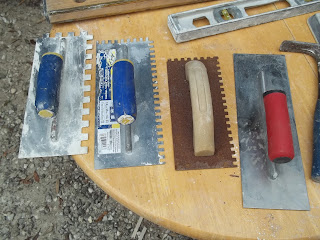
Tools necessary to lay tile for floors and walls

Tools for Laying Wall and Floor Tile

Picture 1: notched trowels used to spread thinset on floors and walls .The notches allow for consistent thicknesses of thinset before you lay your tile. from left to right the first is a 1/2 notched trowel used for natural marble and slate tile, The second is a 3/8 inch trowel for large format floor tiles. The third is a 1/4 inch notched trowel, The most common used for floor and wall tile. Finally there is a finishing trowel for skin coating  thinset smoothly on a surface.,
Tile Tools: Stone Chipping Hammer, Margin Trowl,Tile Nippers

Tile Tools: Stone Chipping Hammer, Margin Trowl,Tile Nippers


Picture two (2) shows from left to right, a stone chipping hammer for chipping concrete, flattening nails and basic hammering, which will be required every now and then. Then there is a margin trowel use for spreading thinset and mixing thinset in a bucket. The third tool is also a margin trowel bit it is a 1/4 inch notch margin trowel used to spread a consistent 1/4 inch thickness of thinset in corners and around edges. Finally there are tile nippers used to take small nips of tile off of the edge of cuts to make precise fits when cuts are just a bit too large to fit,
12 inch speed square and 6 inch speed square plus 2 levels

12 inch speed square and 6 inch speed square plus 2 levels

Picture three (3) shows 2 speed squares. One is a 12 inch square and the other is a 6 inch square used to draw straight square lines on tile to make cuts. There are also pics of two  levels . One 2 ft level and the other is a 4 ft level used to check rows of tile for levelness and also to keep lines straight.
Bag of spacers. Used to keep tile staight and lines even

Bag of spacers. Used to keep tile staight and lines even

Picture four  (4) shows a bag of spacers. These are very important  in the tool bag for keeping tile     straight and lines even.
Hand broom, tape measure, grout float and razor knife tile laying tools

Hand broom, tape measure, grout float and razor knife tile laying tools

Picture five (5 ) from left to right : the all important hand broom to keep all surfaces free of debris and dust before laying tile, On top, the tape measure, used often . In the middle, the grout float used to grout finished tile. Finally,  the razor knife to sharpen your pencil and also will be useful for many other tasks.
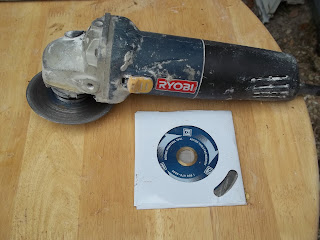
4 inch grinder with a 4 inch diamond blade

4 inch grinder with a 4 inch diamond blade

Picture six (6).  This picture is of a 4 inch grinder with a 4 inch diamond blade to cut tile. Very useful on the job and will cut tile ,stubborn toilet boltscopper pipe, steel  nd just about anything that hampers you from laying flat tile.

Hand Tile Cutting Machine

Picture severn (7) is a  hand  tile cutting machine for straight tile cuts and may take some time to master its use  but will really be helpful along walls where many cuts the same size are needed.

Picture of a tile cutter

Tile Cutter

Picture 8:  Another view of a tile cutter

Tile Cutter Ready to Cut Piece of Ceramic Tile

Tile Cutter Ready to Cut Piece of Ceramic Tile

Picture nine (9) a side view of a tile cutter with a tile on it ready to be cut

Picture of Wet Saw Used by Professional Tile Installers

Wet Saw Used by Professional Tile Installers

Picture ten (10)  is a wet saw used mostly by a professional tile installer and needed for any marble installation.
Picture of Wet Saw

Picture of Wet Saw

Picture 11. Another view of the wet saw

7 inch diamond bladee wet saw

7 inch diamond bladee wet saw

Picture 12:  Final picture of wet saw  equipped with 7 inch diamond blade
Picture of bucket used for mixing thinset

Bucket for water and mixing thinset.

Picture of sponge after using it to lay tile.

Sponge Used in Laying Tile

Saturday, November 15, 2014

Tile Floor Installation Costs for 350 sq ft

Affordable Tile Installations are out there...

But shopping around is a must. This  job was a repeat customer who had the exact same kitchen tiled 2 years ago and had a fire  in his home and called to have it tiled again.

All the Hardi board was laid on Tuesday and all the tile laid on Wednesday then grouted today. The total time to install this kitchen was 18 hours at a labor cost of $1475.00.This is a price you will have to really search around to find  but a experienced tile guy can get you installed for this cost and make  really good pay at the same time.
   
The materials needed to do this tile installation job  were as follows:
  • 375 sq ft of tile
  • 24 sheets of quarter inch Hardi board
  • 12 lbs of 2 inch galvanized roof nails
  • 4 - 50lb bags thin set
  • 3 -25 lb bags sanded grout
  •  1 -500 pc bag of 3\16 spacers

If you need a tile installation in your home be diligent shop around and do your homework to get the best installation at a reasonable cost.

On the first days all the Hardi board was installed. On the second day here you see the tile started

notice whole tiles in each door as the layout is squared and tile will all install off of this layout

Another view of layout with whole tiles in each door

View of whole tile in one door way

View of whole tiles in other doorway

Half of the room laid by noon time

A closer look at half of the room laid

Working in the rest of the room off of the finished half

Completed grouted room on the third day!

Tuesday, November 4, 2014

Shower Installation Question from Reader

Shower Installation Question


A shower install question, please: I put 1/2 Hardiboard over studs (16" ctrs), muddled    but did NOT tape joints or corners, then heavily coated joints with Mapei Aqua Defense, with joint tape, and 2 coats on all backer board, with extra Aqua Defense in corners. I'm super worried about not having taped the thin set. My tile is ceramic, 9x12". What do you advise as my path forward? Many thanks!! R.Kern


Friday, October 31, 2014

Tiling and Grouting in Same Day

Tile and Grout in the Same Day? YES!

 
The live feed blog written the other day focused on a backsplash that was completed in about 4 hours. The blog post walked the reader through the backsplash installation from start to finish. It was installed and grouted within this 4 hour time frame. Now there are some installers and manufacturers of tile and tile products who will tell you  that you have to wait 24 hours before grouting tile. In some instances this is completely true. Whenever using tile adhesives the time required for the premixed stuff is 24 hours .
 
However I am a mason and all tile I install is set and installed with concrete. And I know from my years as a stone mason and tile installer that concrete is concrete no matter  grout or thin set it is still concrete. If  you use the correct thin set and the weather allows your tile to dry beyond the phase of still moving then applying the grout is not a issue again as long as the tile is set enough not to move. Now I must also be clear that NEVER at any time do you walk on tile before the 24 hour drying time because this WILL weaken the bond of the tile to the floor. In this instance it was a backsplash so walking on the tile to grout it was not a issue. IF you have questions or comments about this post FEEL FREE TO COMMENT WE INVITE ALL COMMENTS AND LOVE TO HEAR ALL POINTS OF VIEW  HERE SO OUR BLOG READERS GET ALL THE INFO POSSIBLE   regards   chris

Friday, September 26, 2014

Copper Pan vs. Rubber Membrane-Unsanded vs. sanded grout-Durock vs. HardyBoard Lowes and Home Depot? Ask Chris I Tile Excellence

Is your plumber insisting on using a copper pan for your shower but you remember reading that rubber membranes were not only much more economical, but lasted forever, and did not leak or rust? You can't remember the details, but you want to talk to the plumber and ask questions or insist on using a rubber membrane, but you need your facts.   "ask chris", the do-it-yourself,  and consumer friendly tile installation blog of Tile Excellence, Inc, is written and answered personally by owner Chris Lawson based on his 34 years experience. There are posts all about copper pans vs. rubber membranes.

Doing it yourself? Tile on top of wood? Durock vs. Hardyboard? Is the tile from the designer store necessary, or can he purchase nice tile at a discount store or at Home Depot?

Hired a contractor or tile installation company?  Is three days a long time for installing a backsplash? Is uneven marble floor installation "expected" as you are being told?

At Lowe's or Home Depot and have a question about a product or material? Do you need sanded or unsanded grout? Less expensive thin set, or the more expensive one the salesperson recommended?

His searchable blog allows you instant access to your questions, ask questions or follow his helpful links.

Need more or need immediate answers? Call him directly! You'll find his email and direct number on his site, and almost without exception, he'll answer the phone the first time you call!

Wednesday, July 30, 2014

Tile Installation Formulas for Floors and Walls


Tile Installation Formulas

[for installing tile flooring and tile walls)


  1. How to Figure Out Square Footage
  2. How to Know How Much Tile to Purchase (once you have sq. ft.)
  3. How to Figure Out How Much Thin-set and Grout [setting materials] You'll Need
  4. How to Know How Much Hardi Board or Durock to order


Unknowingly experienced tile installers use formulas every day.Through experience  we just automatically figure in our thinking of jobs using unnoticed formulas every day.It just dawned on me the other day on the job   that I could share-some of these formulas to readers and it would help them understand more about what it takes to install tile and how to understand more about how to find a reasonable installer for their job.

1 .the first and foremost formula  is the figuring of  square footage 
  • the ft of the length multiplied by the ft of the width determines the total sq ft.
    •  for instance  a 5 ft room length  by 5 foot width = 25 total sq ft
  • a 10 ft wide room by 20 ft long = 200 total sq ft room

2. After you know you sq ft of tile to be installed .you need to know  how much tile to order.Generally you need 10%more tile than the actual area to be tiled to account for cuts and waste when installing straight line tile .If you are going to lay tile in a diagonal pattern you will need to add 15% more tile than actual area to be tiled because with a diagonal installation there will be more cuts and waste

3.The formula to figure setting materials grout and thin setis pretty straight forward. For every 100 sq ft of tile you will need 50 lbs of thin set mortar  and 25 lbs of grout

4 .Hardi Board and Durock is generally sold in 3ft by 5 ft sheets= 15 sq ft per board. So you need 1 board of Hardi Board or Durock for every 15 sq ft of tile to be laid.It takes one half pound of nails to nail each board. So 1 lb of 2 inch roof nails for each 2 boards of 3 ft by 5 ft Hardi Board or Durock boards to be installed.

These are some  formulas needed to understand basic tileinstallation . All tile installers even if unknowingly use these formulas every day when pricing and preparing for tile installation. Tile jobs are priced upon the sq ft of tile to be installed the sq ft of the Hardi board or Durock and the shape of the area to be installed in.

Other factors include:

  • the materials to be installed , mosaic tile , marble or slate
  • tiles are more labor intensive and cost more per sq ft to install than ceramic or porcelain tiles. Every tile installer has a different cost base according to their expertise,
  • overhead,and how busy they are. Shop around, get references
  • be comfortable with whomever you hire to install tile in your home.
  • But most important remember tile in your home when installed correctly will be there for many many years so make sure from the beginning it is exactly the look you want!

Hope this info has been helpful and as always If you have specific questions we are always here at Tile Excellence  to answerany questions you may have about your tile installation project
thanks again

Chris & Diana

Friday, April 18, 2014

Question from reader and my responce

Hey There, Regards, Chris tileexcellence.com seopoweredwebsites.com
Morning Chris,

Well I'm at the point of applying tile in the shower and on the tub deck and backsplash when the tile arrives. However, I have a question about adhesives and waterproofing and crack isolation membrane, specifically Mapelastic AquaDefense, which is a paint on membrane which was recommended when I was picking up quick pitch systems and floor mud and I said sure; @ $50 a gallon. The tile guy I have here said it would produce a better bond but apparently he didn't read all the specs because you can't apply it and then use premixed adhesives which I assume rules out Type 1 Mastic and limits him to thin set which he didn't intend to use on the walls and ceilings.

Now I haven't actually applied the liquid membrane yet and was even wondering if it was a good idea because as an after thought, I'm thinking that it would hold any water seeping through the tile at the top of the base whereas I thought the idea was for any water seeping through to arrive at the shower tub membrane and be weeped over to and removed by the weep holes of the clamping drain.

So given this, I suppose my questions are:

1) Is Type 1 Mastic a better adhesive that latex or acrylic thinset and which of those two are better?

2) Is this membrane product even worth using at all?

3) Might it be worth using on the floor base and cinder block and deck mud bench seat and leave the hardy board untouched.

4) Or use it on the entire shower surface and tub deck and use thinset, latex or acrylic, on all surfaces including the ceiling which was the recommendation of the Mapei Product Support guy. He also said there is a quick drying thinset that I could/should use on the ceiling.

I was thinking that if I do the seat and floor, I'd leave six inches around the drain untreated as a means of allowing any water that did get through to weep to and pass through to the shower pan membrane.

I did search the internet but couldn't find any useful info on this situation and any thoughts you might have would be helpful.

Thanks

Kirby


Chris Lawson tileexcellence@gmail.com

9:36 PM (22 hours ago)
to Kirby
I always prefer thinset over any adhesive as concrete is never affected by water and lasts a lifetime.
using the waterproofer on the entire shower walls and floors is always a good idea and insures no water EVER
ends up behind walls and effects wood.  leaving  space around the drain doesn't seem required as if water ever gets by
the waterproofer it will be drained by the drain weep holes any way. Many showers and wet installations are done entirely
with out the waterproofer and last problem free for the entire life of the installation. But the use of waterproofer just insures added protection and safeguards against  any water damage that could ever occur  regards   chris 978-471-9127

Featured Post

Home Renovation From Gut Rehab in Less Than 4 Months!

Home renovation finished products This house is a gut rehab ¹ job. My team and I started this project in April 2019 and it is now compl...

Our Most Popular Posts