Search This Blog

Monday, December 28, 2015

Installing Natural Slate Tile | Here's How to do it

Natural Slate is One of the Most Challenging Materials to Install 

because of the variation in the natural materials. Some pieces of slate can be as thick as 3/4th of a inch while other pieces are only 1/8th of a inch. So when installing this beautiful material  it is required to start installing  the thickest pieces first  then build up with thinset the thinner pieces to make your installation flat and flush. As well as being different thicknesses, the slate is also different sizes in square dimension. It is very imperative that you use care and patience to space and keep your lines  as straight as possible. Natural slate tile is one of the most color variant material I install. I often refer to it as rainbow slate because of the wonderful color variation in the material. 

Installing natural slate is most certainly not to be done by the inexperienced tile setter and a slate specialist is a true artist. I love the challenge myself and the slate material is without a doubt my favorite natural material. I hope you enjoy the  pictures below and appreciate the care and patience it took to install the tile in the photos  See previous blog on slate installation on Tile Excellence's Google+ page. THANKS  Chris

Slate Tile Thickness Variation

Side View of Slate Showing Variation in Thickness of Material

Ungrouted Wall Slate Size Variation

Wall Slate Ungrouted Showing Variation in Size of Tile

Grouted Wall Slate with Design

Grouted Wall Slate with Design Strip

Ungrouted Slate

Ungrouted Wall  Slate

Grouted Wall Slate With Design Strip

Grouted Wall Slate with Design Strip

Show Wall and Ceiling Slate

Shower Wall | Ceiling Slate

Shower Wall Slate

Shower Wall Slate

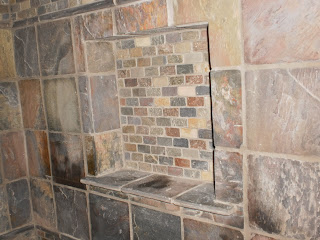
Slate Tile in Wall Soap Box

Slate Tile in Wall Soap Box

Wall Slate and Sink Backsplash

Wall Slate | Slate Backsplash

Slate in Wall Soap Box

Slate in Wall Soap Box

Wall Slate and Floor Slate

Wall Slate and Floor Slate

Floor Slate and Wall Slate

Floor Slate | Wall Slate

Design Strip Slate Meets Shower Wall Slate

Design Strip Slate Meets Shower Wall Slate

Wonderful Color in this Slate Floor

Wonderful Color in this Slate Floor

 Slate Shower Curb Shower Floor | Outside Bathroom Floor

Slate Shower Curb Shower Floor | Outside Bathroom Floor


Friday, December 25, 2015

Do it Yourself [DIY] Backsplash Secret Techhniques

A tile backsplash is one of the quickest easiest ways to improve your kitchen without spending an arm and a leg to get it done. There are certain pointers and techniques that I've learned over 30+ years of tile installation that will make the job more manageable.


The first consideration is the tile you pick out;  it makes all the difference in the world. Remember a kitchen backsplash is a "right in your face" kind of tile installation . You will see it many times each day and it's the first thing seen by anyone who ever goes into your kitchen, Make sure you pick out a tile that  compliments your  décor. If you plan on doing the [DIY] tile yourself it's probably a good idea to keep it simple.


There are some extraordinary glass tiles available at Home Depot or Lowes for great prices or online.  Be aware If you shop at a tile store the designers there tend to market/push more intricate tiles and more complicated iinstallation designs. As you add to the intricacy of the design then you also add to the complication of the installation. Subway tile is about the easiest installation out there and some pencil strips of color  all along on top of a  row of tile is a nice simple custom installation yet still uncomplicated. 4 inch by 4 inch tile in squares with some deco tiles added in also is a non complicated colorful installation. Each of these tile installations require no spacers because they are self spacing tile and use unsanded  grout. Glass mosaic tile has some complications in cutting the material and it would be advantageous to pick out a glass tile that will require at least cutting as possible. 1/2 inch squares or 1 inch squares usually fall close enough to corners and under cabinets that little cutting is necessary . When installing a backsplash I would recommend using Thinset concrete and not a adhesive because of clean up and grouting issues. Just remember thin set is concrete and  ALWAYS wash it off your tile before it dries or tomorrow you will need a chisel.


There  is a secret I am about to share with you now about glass tile installation that makes all the difference in the world because of the nature of the material. Some glass tile is transparent and you can see right through it. Other types of glass tile are  very,  very thin and it is impossible to thinset the tile to the wall without getting thinset in all the joints of the
and hampering grout coverage.


The info I am about to give you I have NEVER shared publicly before and Is a method I figured out on my own some years ago.  When installing glass tile I always  use unsanded grout  and I get a shade darker grout than what I want as a finished color. NOW here it is:

Using white thinset mix the grout color into your thinset and color your thinset to your grout color the ratio would be about 2 parts thinset to 1 part grout .


You could also do this with acrylic paint coloring your thinset to the desired grout color. Then your transparent tile shows behind the tile and any thinset bleeding through the joints  with thin tile will cover with grout. I've been installing glass tile in this manner for many years and have had great success as you can see below .

Marble Mosaic Picture Framed Backsplash

6”by 6” Tile Picture Frame | Hand Cut 3” dots

6”by 6” Tile Picture Frame | Hand Cut 3” dots

Pencil Trim Marble Picture Around Marble Mosaic

Pencil Trim Marble Picture Around Marble Mosaic


Glass Subway Tile with Diamond Design

Glass Subway Tile with Diamond Design

Flower Marble Backsplash Behind Stove

Flower Marble Backsplash Behind Stove

Glass and Marble Tile Backsplash

Glass and Marble Tile Backsplash

4 by 4 Tile with Glass Tile Mosaic Tile

4 by 4 Tile with Glass Tile Mosaic Tile

Custom Glass Tile Countertops with Colored Thinset

Custom Glass Tile Countertops with Colored Thinset

 Rainbow Glass Mosaic Tile

Rainbow Glass Mosaic Tile


Flower Design Marble Tile Backsplash

Flower Design Marble Tile Backsplash

3 ft by 6 inch Tile with Design Strip Custom Backsplash

Teardrop Glass Tile  Cut at Every Straight Edge

Teardrop Glass Tile  Cut at Every Straight Edge

Glass Tile Fireplace With Colored Thinset Used to Grout this 90 sq ft of Tile

Glass Tile Fireplace With Colored Thinset Used to Grout this 90 sq ft of Tile

Glass Tile Centered Backsplash with Travertine Border

Glass Tile Centered Backsplash with Travertine Border

Glass and Travertine with Marble Pencil Border with 45 Degree Angle Cut

Glass and Travertine with Marble Pencil Border with 45 Degree Angle Cut

 Mother of Pearl Glass Backsplash

Mother of Pearl Glass Backsplash

Rainbow Multi-Color 1” Glass Mosaic Tile

Rainbow Multi-Color 1” Glass Mosaic Tile

I hope this info on backsplashes has been helpful to you and as always I'm here to field any questions you have to help you out   thanks  Chris


Sunday, December 6, 2015

Laying a Travertine Marble Tile Floor Successfully

Laying a travertine marble tile floor

seamlessly (i.e., without grout) is a skill that you can easily develop. Only a little bit of knowledge, a few tools, patience, and diligence are required to complete this job successfully.
There is no need to be intimated by this type of project. After all, if the ancient Romans and Greeks were able to do it, why can't you?
There are only a few things besides the tile that are required to complete this kind of home improvement job: a thin-set mortar, notched trowel, a level, and a soft rubber mallet. The difficulty level of this do-it-yourself project is considered to be medium or moderate; however,that is due to the fact that some tiles may need to be reset in order to ensure a level plane across the floor.

It Is All In the Preparation

Preparation is key to a seamless installation of this type of natural stone. Ninety-nine percent of all successful home improvement jobs start with proper prepping of the working surface. For any surface--whether it be a floor, countertop, or wall, make the working area as level as possible before you do anything else. Check your work with a level prior to any travertine tile installation.
Application of Thinset On Flooring - Kick It Up A Notch
Working from the middle of the room, use the trowel's notched edge to apply an even coat of thinset mortar to the flooring surface, spreading it evenly in the area where you will set the travertine. Take your time when doing this in order to avoid ridges and/or air pockets which may cause the tile to settle improperly.

Application of Thinset On Back of Tile - Flat Is Beautiful

Now it is time to use the trowel's flat side to apply a skim coat thinset to the back of the travertine marble tile. Ensure it is evenly distributed throughout, taking care to coat the edges of the tile.
Apply the Tile With Gentle But Firm Persuasion
Set the tile in place on the floor, applying pressure, and moving it back and forth in all directions to form a good bond and to eliminate any unforeseen trapped air bubbles/pockets.
Then it is time to set the second tile next to the first, lining up the corners, and moving that tile back and forth as you did the first one.
Make sure the tiles are the same height. Using a soft rubber mallet, tap gently on the second travertine marble tile until it abuts the first tile. There should be a tight fit with no gaps.
Keep a Level Head and Get a Level Floor
Lay a level on the tile floor to ensure that tiles are flat and flush. If a tile is too low, remove the tile and add more thinset on the floor. If the opposite is true and the tile is too high, pry up the travertine and remove excessive thinset. Either way, there is a remedy so you can get a level floor by keeping a level head and doing what needs to be done to get the perfectly seamless travertine marble tile floor.
Working with travertine floor tile [http://www.travertinetilestore.com/travertine-floor-tiles-2] is not as difficult as you might have been told or think. Laying a travertine marble tile [http://www.travertinetilestore.com] floor seamlessly can be completed easily and successfully as a do-it-yourself project.


By   |   

Article Source: http://EzineArticles.com/4631730

Wednesday, March 11, 2015

How to Install Kitchen Tile Backsplash

How to Install a Kitchen Tile Backsplash : Rooms : Home & Garden Television - http://pinterest.com/pin/573364596285652899/?s=3&m=blogger

Tuesday, February 24, 2015

Choosing Subway Tiles for Kitchen Backsplash: 

Glass or Ceramic?


Author:

My Tile Gal

Subway tile backsplash is just one of the solutions to make the kitchen area look superb and according to your desires. If you are looking to build an incredible choice, sensible, and also beneficial, subway tile backsplash for kitchen is a great choice backsplash subway. Subway tile backsplash is confirmed strategy and proved as before that is definitely an outstanding selection for the kitchen area renovation ideas. It is a well known preference simply because it brings together luxury,beauty and functionality and that is a simple solution which delivers better value for your money.

Kitchen backsplash is essential if you wish to maintain cooking area with a gas and even make your kitchen bright and gorgeous. Subway tile backsplash in the kitchen must be one which is not difficult to install as well as minimizes the requirement for routine maintenance.When considering kitchen renovation there is certainly all you should do in the beginning is to define ideas thoroughly on paper. Begin with a strategy on paper, the buy of required accessories and yes make sure to deliver the steps properly because it decides the quantity and variety of subway tile backsplash as well as other materials used that you require. Purchase parts with a bit of extra help to succeed in situation of breakage or damage will be all set. Subway tile backsplash from glass, ceramics as well as other needs or personal preferences should definitely be reasonable and logical.
Kitchen backsplash that defines the kitchen which make it vibrant and extremely trendy and stylish. With some little hard work along with a little creativity you could make the kitchen area into a room because kitchen is the area where all family member sit together many time in a single day. Modern residence and also today apartment users are adopting a lot of different approaches to insert a little bit design and style in their kitchen area. It is actually the most impressive places to include a touch of smoothness as well as the contemporary style of the backside wall of the kitchen area.Everyone can easily enhance their kitchen with the following recommendations to create the design and style of the kitchen even independently

Glass subway tile backsplash is not difficult to thoroughly clean and maintain and also it\'s a terrific way to put some color to your kitchen. Panels can be found in various shades and colors an ideal composition of parameters to granite countertop, tops and subway tile backsplash. Travertine stone fell as they are easily obtainable in a variety of sizes are getting to be very popular to be used in the cabin specifically in the southwestern and modern western the United States. The disadvantage only utilizes products for example stone sealed to avoid backsplash color selection as it is porous characteristics. Subway tile backsplash composed of stainless-steel can be utilized as a backsplash in the kitchen an innovative and modern use. These types of metal plates are extremely great for example exhibitions include things like natural stone or ceramic subway tile backsplash. The color combination and layout and style is very important to renovate the backside wall of the kitchen.

Ceramic Tiles
•Ceramic tiles are clay shape tiles which are coated in a fine surface of glaze. This glaze is generally a form of glass that is definitely melted and joined onto the body of the tile. The outcome is a long lasting easy to cut and also fix the tile that may possess a shiny matte or textured surface area. Ceramic tiles are convenient to thoroughly clean on kitchen backsplashes that will favor to protect the wall from food splatters. Sometimes ceramic glaze may damage or fad there is necessitating a sealer being practiced once a year to the tile to provide protection from stains.

Glass Tiles
• There are many types of glass tiles are available on the market, every one ideal for backsplash use. Glass tiles are made from solid glass. A few have pigments blended into the glass for color or shade, while some have color painted onto the backside of plain clear glass. Glass tiles may be matte, textured or shiny in finish and can available various measurements. Glass tiles tend to be more challenging to cut and to fix and for optimum results must be fitted by a person who is highly skilled with the materials. Particular cutting equipments are needed, especially if a design for the backsplash demands multiple cut tiles.
'
Point To Highlight
•Both ceramic and glass tiles can be utilized on backsplashes without any difficulties. Both of them are simple to wipe, clean and which are ideal for use in this particular space. Make your selection on the basis of design and style, shade and materials choices; glass tiles can be found in recycled resources for environmentally friendly constructing assignments. Ceramic tiles may possibly are less expensive or be more convenient to install based on the particular company as well as producer. Both components or materials may also be utilized at the same time in a single space to generate personalized styles and shapes.


About the Author
Author My Tile Gal is the owner of My Tile Backsplash, that offers glass tiles, ceramic tiles, natural stone and beautiful switchplates. Whether it is specialty grouts for your glass mosaic tiles or cabinet hardware for your kitchen there are many options that can use to make a backsplash both functional and beautiful. Visit Today.

Featured Post

Home Renovation From Gut Rehab in Less Than 4 Months!

Home renovation finished products This house is a gut rehab ¹ job. My team and I started this project in April 2019 and it is now compl...

Our Most Popular Posts